
filed in
Customizing and Personalizing your Opt-In Process using MailChimp
Imagine this: Melanie (who happens to be your most perfect client, though neither of you know that yet!) is clicking around online.
She’s searching for just what you have to offer. She spends time with your website and gets more and more drawn in as she scans through your site. She reads your last couple of blog posts and feels an instant connection with you. She’s not quite ready to buy what you’re offering yet but she’s very interested to see how your services might be exactly what she’s been searching for. She spies your newsletter sign up, is intrigued by your free opt-in offer and can’t wait to sign up.
Now…which sounds better?
She genuinely wants to hear from you! She inputs her email address and is taken to the default and oh-so-generic confirmation created a by your newsletter provider. Then she waits to hear from you. She might even forget she signed up.
OR
She genuinely wants to hear from you! She inputs her email address and is taken to a completely personalized and customized opt-in process that sets you apart from other newsletter lists she’s subscribed to. She reads every detail and because you’ve thought about engaging her right from the beginning. She’s now back on your site and is reading your offers more carefully.
Which experience do you want for your clients?
It seems to me that personalizing the opt-in process is one of the things that seems to come last on everyone’s list (pardon the pun!) when designing their website and it’s time for that to stop.
I believe ensuring your newsletter signup process is in complete brand alignment with your web presence is important to consider when you’re in the incubator process of developing the content for your website.
It’s also still not too late to tweak your opt in process even if you’ve already got a site launched and have a steadily growing list. It’s really about making sure it genuinely reflects you, your brand and its place in the market.
I know we all want the Melanie’s of the world to know that trusting you with her email address is a sound decision.

How you can customize your own process using Mailchimp (the newsletter provider I recommend to all my clients and use personally)?
Step ONE: Sign in to your Mailchimp account and navigate to your LISTS.
Step TWO: Hover over SIGNUP FORMS and click.
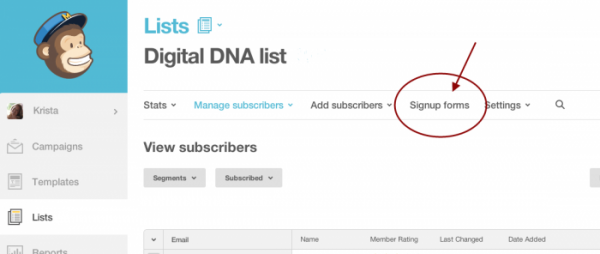
Step THREE: Click on GENERAL FORMS.

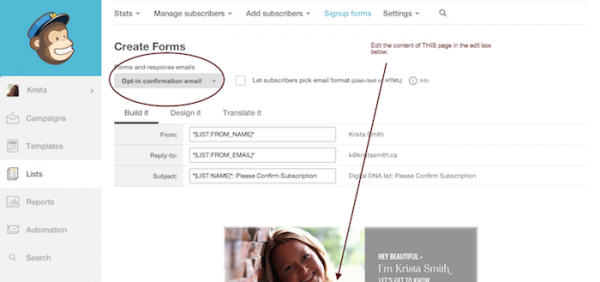
Step FOUR: Click the arrow under forms and response emails and select OPT-IN CONFIRMATION EMAIL. Customize your header and main copy that show up using the onscreen editing options. Just hover over to change.
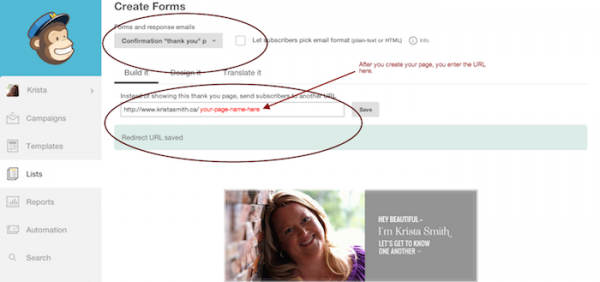
Step FIVE: Click the arrow under forms and response emails and select SIGNUP “THANK YOU” PAGE. What I’ve done is added changed this from the default process (which would be to receive ANOTHER email) and instead they are taken to a page I’ve added on my website. Once this page is created, all you do is add in the link as shown in the image below (mine is there as an example).
**On this page, I like to include a thank you for joining, a promise (what you’ll be using the list for), a welcome, an ask to go back to their inbox to finish the process, and even a reminder about how to mark your email as safe!**
Step SIX: Click the arrow under forms and response emails and select OPT-IN CONFIRMATION EMAIL. You can edit the details of this right in Mailchimp.
**On this page I like to include a, “You’re almost there” sentiment along with an explanation that this process is to protect them from spam, that this is the last step before they will get your free opt-in, and that it is important for them to click the, YES, SUBSCRIBE ME TO THIS LIST to actually complete the process.**
Step SEVEN: Click the arrow under forms and response emails and select CONFIRMATION “THANK YOU” PAGE. Again, this is one of those create the page on your website and just enter your URL in the box (like I have, below as an example!)
**On this page it’s your last chance to make a great first impression. This is where you’ll have your free opt-in they can download. You can also include an invitation to join you on social media, to a private forum, or anything else! This is your chance to connect with them. Add as much or little information that you want. Just remember to have a strong call to action (like, “Hey, you can also join me on Facebook HERE” [and insert the link!]),**
Step EIGHT: Give yourself a pat on the back! You’re done the welcome process.
Your clients deserve this kind of thoughtfulness. I look forward to hearing your thoughts in the comments below :)

This is one of the reasons I love you so much. You make it easy and significant at the same time. Great post, K!
xo
Jac
Thanks, Jac! xo K
Just circled back around to this today and shared with those in my circle. Such a simple, yet effective tool. Love this idea! Thanks for sharing!